
No-Bake Biscoff Cheesecake is a delightful treat that embodies the essence of comfort food and nostalgia in every bite. This creamy, decadent dessert offers a harmonious blend of the rich flavors of Biscoff cookies and smooth cream cheese, all without the need for an oven. Imagine indulging in a slice of this cheesecake at a family gathering or during a cozy night in; it’s sure to evoke smiles and satisfied sighs from everyone around the table. With an easy, step-by-step recipe to guide you, making this enchanting dessert becomes a straightforward endeavor that will impress your friends and family.
Ingredients
For this No-Bake Biscoff Cheesecake, you will need:
- 250 g Lotus Biscuits (about 2 cups) – These crunchy biscuits provide a delightful base with their caramelized flavor.
- 75 g unsalted or salted butter (melted) (5 tbsp) – Adds richness and moisture to the crust.
- 300 ml double cream (cold) (1 ¼ cups) – This will be whipped to create a luscious filling.
- 500 g full-fat cream cheese (room temperature) (2 cups) – The star of the cheesecake, delivering a creamy and tangy kick.
- 300 g Lotus Biscoff spread (1 ¼ cups) – This velvety spread infuses the entire cheesecake with that irresistible Biscoff flavor.
- 50 g icing sugar (⅓ cup) – Sweetens the filling perfectly, balancing the flavors.
- 200 g Biscoff spread (melted) (¾ cup) – For a luscious topping that makes this dessert even more indulgent.
- 2-3 Lotus biscuits (finely crushed) – Used for decoration, adding a crunchy texture.
- 1 whole Lotus biscuit (for decoration) – To crown the cheesecake with a touch of elegance.
Step-by-Step Directions
Begin by lining an 8-inch (20cm) springform tin with a circular piece of parchment paper. This will make it easier to remove the cheesecake later without damaging it.
Next, crush the Lotus biscuits into fine crumbs. You can do this using a food processor for convenience or by placing them in a sealed bag and crushing them with a rolling pin for a more hands-on approach.
Mix the biscuit crumbs with the melted butter until the mixture resembles wet sand. This forms a moist base that will hold its shape once pressed into the pan.
Press this mixture firmly into the bottom of your lined springform pan, using the back of a spoon to smooth it out. Refrigerate the base while you prepare the filling, allowing it to firm up.
In a large mixing bowl, whip the cold double cream until it holds stiff peaks. This step is crucial as it contributes to the light and fluffy texture of the cheesecake. Once whipped, set this aside.
In another bowl, beat the cream cheese, icing sugar, and Biscoff spread together until smooth and creamy. This creamy dreamy blend is the soul of your cheesecake.
Gently fold in the whipped cream to the cream cheese mixture, taking care not to overmix. You want to preserve the airy quality of the whipped cream, keeping your filling light and fluffy.
Pour the cheesecake filling over the chilled biscuit base, spreading it out evenly with a spatula or the back of a metal spoon. Smooth the top and refrigerate for 6–7 hours, or ideally overnight, to allow the cheesecake to set properly.
Once the cheesecake has set, carefully remove it from the tin. Melt the Biscoff spread in the microwave or in a small saucepan over low heat until smooth and pourable. Drizzle the melted Biscoff over the top of the cheesecake, spreading it into an even layer and allowing it to drip over the edges slightly for a dramatic effect.
Sprinkle the crushed Lotus biscuits around the edges of the cheesecake to create an appealing decorative border. Finish with a whole Lotus biscuit placed in the center for that simple yet elegant touch.
Return the cheesecake to the fridge for 30 minutes to allow the topping to set before serving. When ready to serve, slice it up using a sharp, warm knife, cleaning the knife in between each slice for the best results.
Tips & Tricks
To enhance your No-Bake Biscoff Cheesecake, consider adding a splash of vanilla extract to the cream cheese mixture for extra warmth and flavor. If you like a more intense Biscoff flavor, you can increase the amount of Biscoff spread in the filling. To ensure the cheesecake sets well, make sure your cream cheese is at room temperature before you begin mixing, which helps in achieving a smooth and creamy filling.
Serving Suggestions & Pairings
This cheesecake is perfect for a variety of occasions! Serve it at birthday parties, holiday gatherings, or a cozy family dinner. It pairs beautifully with a cup of coffee or tea, making for a delightful end to any meal. For an extra touch, consider serving it alongside fresh berries or a scoop of vanilla ice cream to balance out the richness.
Nutritional Information
A slice of No-Bake Biscoff Cheesecake generally contains approximately 350 calories, depending on the portion size. While this dessert is a treat and should be enjoyed in moderation, it provides a delightful balance of flavors and textures that make it worth the indulgence.
Storing Tips & Variations
Store any leftover cheesecake in an airtight container in the refrigerator for up to five days. For longer storage, you can freeze slices of cheesecake wrapped in plastic wrap and then placed in a freezer-safe bag for up to two months. To enjoy variations, you could try adding a layer of caramel sauce or nuts to the filling or topping. Experimenting with different flavors of spreads can lead to fascinating flavor profiles as well!
Conclusion
No-Bake Biscoff Cheesecake is more than just a dessert; it’s an expression of comfort, nostalgia, and indulgence. I hope you’re inspired to create this delightful recipe and share it with your loved ones. Don’t forget to let us know how your cheesecake turns out – we can’t wait to hear about your experience!
FAQs
-
Can I use light cream cheese instead of full-fat?
While you can use light cream cheese, it may not yield the same creamy texture. The cheesecake might be less rich and may not set as firmly. -
How long does the cheesecake need to set?
The cheesecake should set for at least 6-7 hours, but ideally, refrigerate it overnight for the best results. -
Can I make this cheesecake gluten-free?
Yes! Use gluten-free biscuits for the crust to make this cheesecake suitable for gluten-sensitive individuals. -
What should I do if my cheesecake doesn’t set?
If the cheesecake doesn’t set properly, it might be due to overmixing the whipped cream or not allowing enough time in the fridge. You can chill it longer to help it firm up. -
How can I customize the topping?
Feel free to customize the topping by adding crushed nuts, a drizzle of chocolate sauce, or seasonal fruits for added freshness!
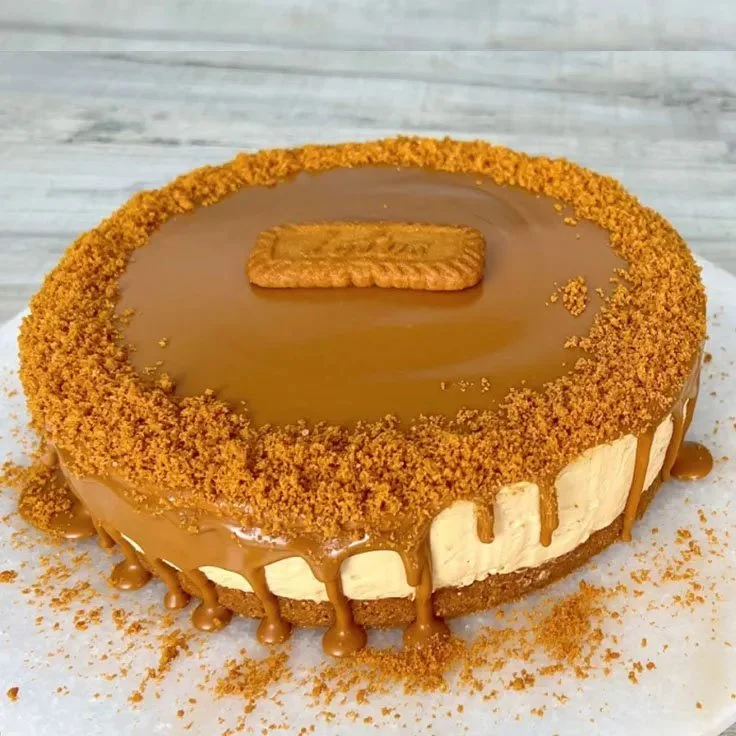
No-Bake Biscoff Cheesecake
Ingredients
Method
- Line an 8-inch (20cm) springform tin with parchment paper.
- Crush Lotus biscuits into fine crumbs using a food processor or rolling pin.
- Mix biscuit crumbs with melted butter until resembling wet sand.
- Press the mixture firmly into the bottom of the lined pan and refrigerate.
- Whip the cold double cream until stiff peaks form and set aside.
- Beat cream cheese, icing sugar, and Biscoff spread together until smooth.
- Gently fold the whipped cream into the cream cheese mixture.
- Pour cheesecake filling over the chilled biscuit base and smooth the top.
- Refrigerate for 6-7 hours or overnight to set.
- Once set, remove the cheesecake from the tin.
- Melt Biscoff spread until smooth and drizzle over the cheesecake.
- Sprinkle crushed Lotus biscuits around the edges and place a whole biscuit in the center.
- Return to fridge for 30 minutes before serving.
- Slice with a sharp, warm knife, cleaning the knife in between cuts.

Leave a Reply