
Red, White, and Blue Patriotic Candies
Red, White, and Blue Patriotic Candies bring joy and color to any celebration, especially during festive occasions like Independence Day or Memorial Day. This delightful recipe is perfect for those who want to create something easy yet stunning, making it an excellent choice for families wanting to bond over a fun kitchen activity. The flavors and textures in these candies are deliciously nostalgic, reminiscent of summer barbecues and colorful fireworks lighting up the night sky. In this step-by-step guide, you’ll learn how to make these vibrant sweets, which are not only visually appealing but also incredibly straightforward to prepare.
Ingredients
To create these lovely Red, White, and Blue Patriotic Candies, you’ll need a few basic ingredients that pack a punch in flavor and fun:
- 1/3 cup light corn syrup: This will add sweetness and help bind everything together, providing that perfect chewy texture.
- 5 tbsp Challenge butter (softened): The creamy richness of butter enhances the candies, giving them that delightful melt-in-your-mouth quality.
- 2 tsp extract of your choice (2 to 3 tsp): Whether you choose vanilla, almond, or another favorite, the aromatic extract will add depth to your treats.
- 1/2 tsp salt: Just a pinch to balance the sweetness and round out the flavors beautifully.
- Red and blue gel food coloring: This vibrant coloring is key to achieving the patriotic palette and can be adjusted until you reach your desired hue.
- 4 cups powdered sugar (4 to 5 cups): This essential ingredient makes the candies sweet and helps to create a dough-like consistency.
- 10 oz white vanilla candy coating (I used CandiQuik): This will provide a smooth, sweet coating and acts as the canvas for your candy creations.
- Sprinkles (jimmies, etc. for decoration – optional): These add an extra festive touch and a bit of crunch to your candies.
Step-by-Step Directions
Creating these colorful candies is easier than you might think. Here’s how to make Red, White, and Blue Patriotic Candies at home:
-
Combine Key Ingredients: In a medium-sized mixing bowl, combine the light corn syrup, softened butter, your chosen extract, and salt. Stir until everything is well mixed and smooth.
-
Incorporate Powdered Sugar: Gradually stir in 1 cup of powdered sugar at a time. Continue until the mixture becomes too stiff to stir with a spoon.
-
Knead the Mixture: Once too tough for utensils, use your hands to knead the mixture. Add more powdered sugar as necessary until it no longer sticks to your hands, forming a pliable dough.
-
Divide and Color: Divide the dough into three equal portions. Keep one portion white, then add red gel food coloring to one portion and blue coloring to another, mixing until you achieve vibrant colors.
-
Shape the Candies: Pinch off small amounts of each color, rolling them into 1-inch balls. Arrange them on trays or baking sheets lined with waxed paper.
-
Flatten the Balls: Using either a flat-bottomed cup or your hand, gently flatten each candy ball, turning them into small disks.
-
Chill Until Firm: Cover the candies with another sheet of waxed paper and refrigerate for 60-90 minutes, or until they firm up nicely.
-
Melt the Coating: While the candies chill, melt the white vanilla candy coating according to package instructions until smooth.
-
Coat the Candies: Using a fork, dip each chilled candy into the melted coating. Tap off any excess coating before placing them back onto the waxed paper.
-
Add Sprinkles: If desired, sprinkle colorful jimmies or sprinkles on top of the coated candies while the coating is still wet.
-
Allow to Set: Let the candies sit until the coating hardens completely. To store, place them in an airtight container.
-
Freezing Option: If you wish, these candies can also be frozen. Just make sure to place them between layers of waxed paper.
Tips & Tricks
- Use Fresh Ingredients: Always use fresh butter and extracts for the best flavor.
- Adjust the Color: Start with fewer drops of food coloring and gradually add until you achieve the desired shade.
- Experiment with Flavors: Consider adding other extracts like peppermint or coconut to create unique flavor profiles for your candies.
- Get Creative with Shapes: If you have candy molds, feel free to use them for fun shapes instead of just disks.
- Make It a Family Affair: Involve kids in the process of rolling and decorating the candies; it’s a great way to build memories together!
Serving Suggestions & Pairings
These Red, White, and Blue Patriotic Candies are perfect for a variety of occasions:
- Patriotic Celebrations: Serve them at Fourth of July barbecues or Memorial Day picnics to impress your guests.
- Dessert Table Highlight: Place them on a dessert table as colorful highlights alongside cakes and cupcakes.
- Party Favors: Package them in cute bags as party favors for your next celebration.
- Ice Cream Toppings: Chop the candies into smaller pieces and use them as delightful toppings for ice cream sundaes.
- Summer Picnics: These candies are easy to transport and make for a fun treat on a sunny day out!
Nutritional Information
Each Red, White, and Blue Patriotic Candy is a delightful treat, bringing sweetness and joy. On average, a single candy contains about 130 calories. While they are a sugary indulgence, enjoy them in moderation as part of a balanced diet, savoring the festive flavors without overindulging.
Storing Tips & Variations
To keep your Patriotic Candies fresh and delicious:
- Airtight Storage: Store them in an airtight container at room temperature for up to a week.
- Freezing: They can be frozen for longer storage. Just layer them with waxed paper and keep them in a tightly sealed freezer bag.
- Flavor Variations: Experiment with different food colorings and extracts for occasions throughout the year—think autumn colors for Halloween or pastels for Easter.
Conclusion
Red, White, and Blue Patriotic Candies are not just visually stunning; they are also a delightful way to celebrate special moments with family and friends. The simplicity of this recipe combined with its vibrant colors makes it a must-try. Don’t hesitate—gather your ingredients, update your kitchen table, and let the creative process begin. We would love to hear about your experiences making these candies, so be sure to share your thoughts and any unique twists you added along the way!
FAQs
1. Can I use other colors for different occasions?
Absolutely! Feel free to use any gel food coloring to match themes or holidays, making these candies versatile for various celebratory events.
2. What’s the best way to store leftover candies?
Store them in an airtight container at room temperature. You can also freeze them for longer-lasting enjoyment, ensuring they’re separated by wax paper.
3. How long can these candies last?
When stored properly, the candies can last about a week at room temperature or up to three months in the freezer.
4. Can I replace the butter with a dairy-free alternative?
Yes! Use a dairy-free margarine or similar product if you’re looking for a vegan or dairy-free option.
5. What types of extracts work best in this recipe?
Common options include vanilla, almond, or coconut. Feel free to get creative and try new flavors that match your taste preferences!
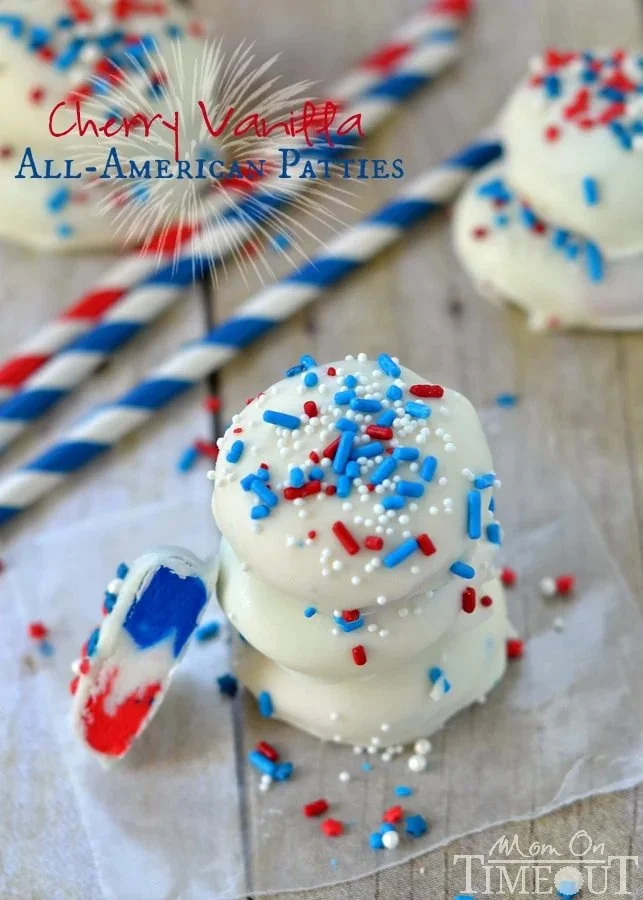
Red, White, and Blue Patriotic Candies
Ingredients
Method
- Combine the light corn syrup, softened butter, extract of your choice, and salt in a medium-sized mixing bowl. Stir until the mixture is smooth.
- Gradually stir in 1 cup of powdered sugar at a time until the mixture becomes too stiff to stir with a spoon.
- Knead the mixture by hand, adding more powdered sugar as necessary until the dough is pliable and no longer sticky.
- Divide the dough into three equal portions: one white, one colored red, and one colored blue.
- Roll small amounts of each color into 1-inch balls and arrange them on trays lined with waxed paper.
- Flatten each candy ball into small disks using a flat-bottomed cup or your hand.
- Cover the candies with waxed paper and refrigerate for 60-90 minutes, or until firm.
- Melt the white vanilla candy coating according to package instructions until smooth.
- Dip each chilled candy into the melted coating using a fork. Tap off excess coating before placing them back on waxed paper.
- Sprinkle colorful jimmies on top while the coating is still wet.
- Allow the candies to sit until the coating has hardened completely, then store in an airtight container.

Leave a Reply